Checklist:
| Project 1 (Week 1) |
| – Blog Setup – Teams and Onedrive Setup |
| Project 2 (Week 1 & 2) |
| – Artist Research Vakseen -Artist Research Worksheet – Elements of Art – Abstract collage inspired by Vakseen – Abstract collage inspired by Vakseen Evaluation |
| Project 3 |
| – Difference between street art and vandalism quiz. ) – Digital drawings street art typography – Digital drawings street art typography Evaluation |
| Project 4 |
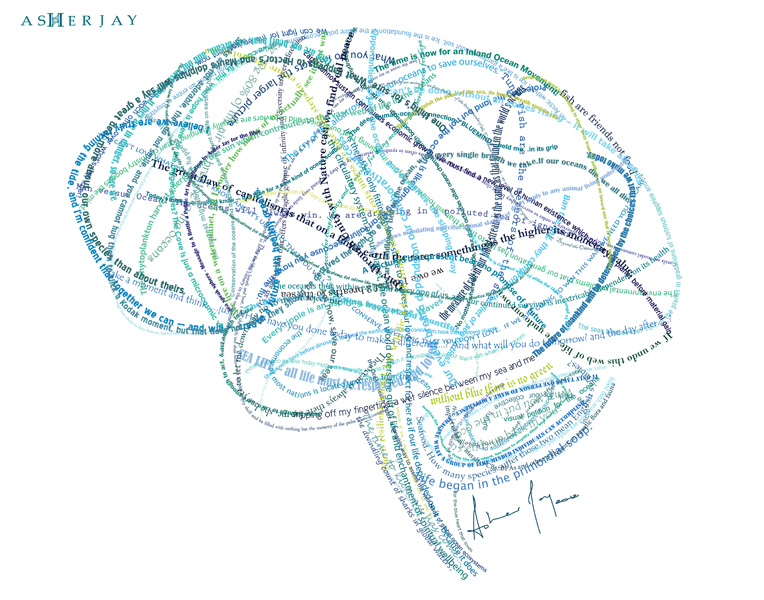
| – Artist Research – Asher Jay – Asher Jay – 2 Typographic illustration/Calligrams – Asher Jay – Typographic illustration/Calligrams – Evaluation – Asher Jay – 3 silhouette Experiments – Photos – Asher Jay – 3 silhouette Experiments – Outcome – Asher Jay – 3 silhouette Experiments – Evaluation |
Week 1 – Project 1
Welcome to your course! This week, we will focus on some essential digital skills that are integral to your academic journey. Our goal is to ensure that you are comfortable and proficient in navigating the digital tools and platforms that will be your companions throughout this course and beyond. We will also create a blog to use as your portifolio and learn how to use it.
- Blog Setup
- Microsoft 365 Setup

- Download Teams to your phone
- Download Onedrive to your phone
Tasks
Blog SetUp
Your digital portfolio is where you will present ALL of your coursework for the academic year. If you produce large-scale work, sketchbook work, or 3D work you must photograph this evidence and present it on your blog as well.
Your blog will be regularly assessed by your project lecturers, your SLA, and your WEX employer link. Therefore, you are required to maintain your blog weekly.
Additionally, it should be free of spelling or grammatical errors. The presentation style and format must be appropriate to allow your visual and written work to be properly assessed.
Your blog will be sent to UAL Awarding Body at the end of the FMP for final assessment. UAL will assess your blog and award your final grade for the year. If UAL is not able to access your blog or assess your work for the whole year, it may affect your grading or achievement. Therefore, do not ever delete work from
your blog and do not take your blog offline.
Your blog must not contain sensitive, inappropriate, or explicit visual material or language. Please speak to your course leader if you feel that you need to post something that could be considered sensitive (for instance, life drawing materials) so that we can help you protect yourself and your site.
Week 2 – Project 2
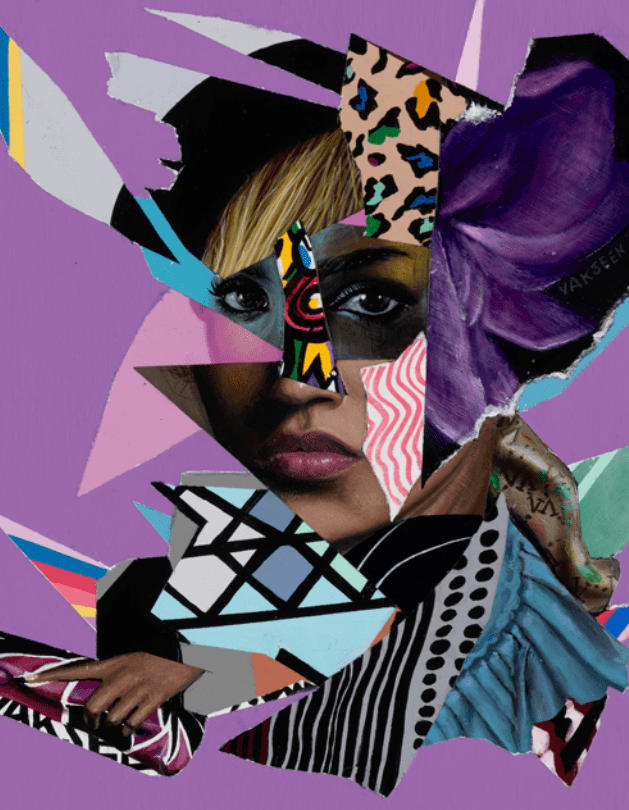
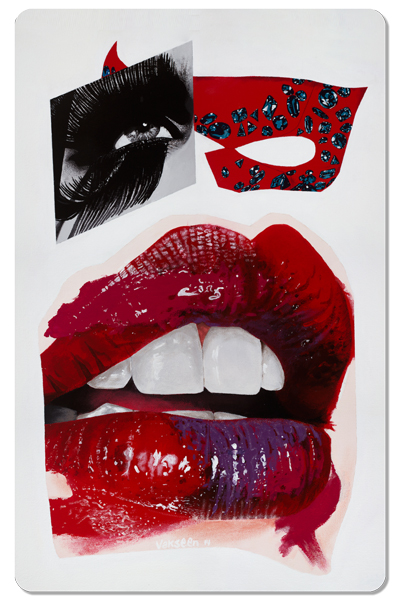
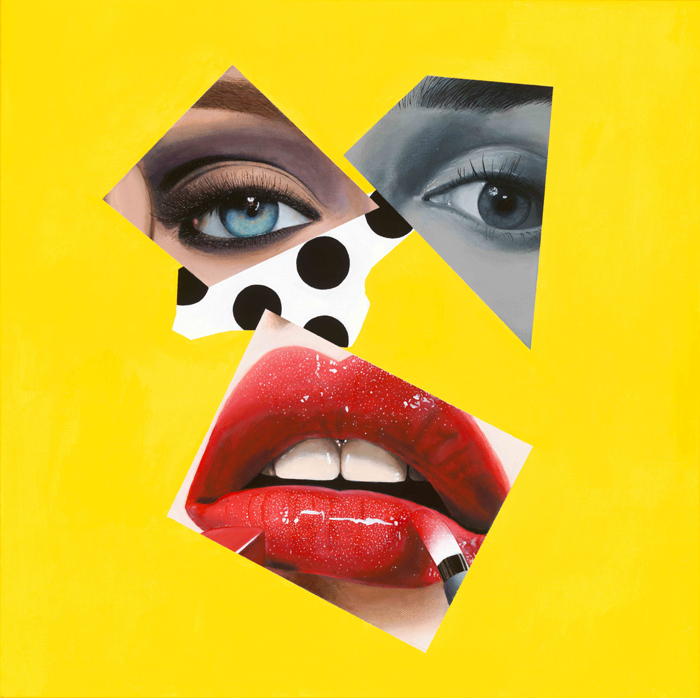
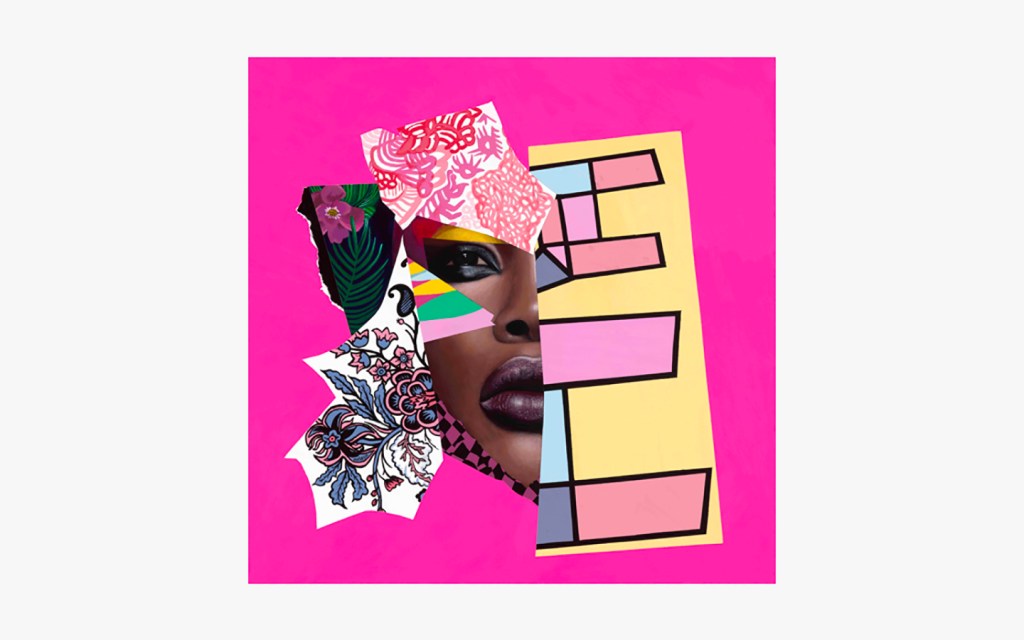
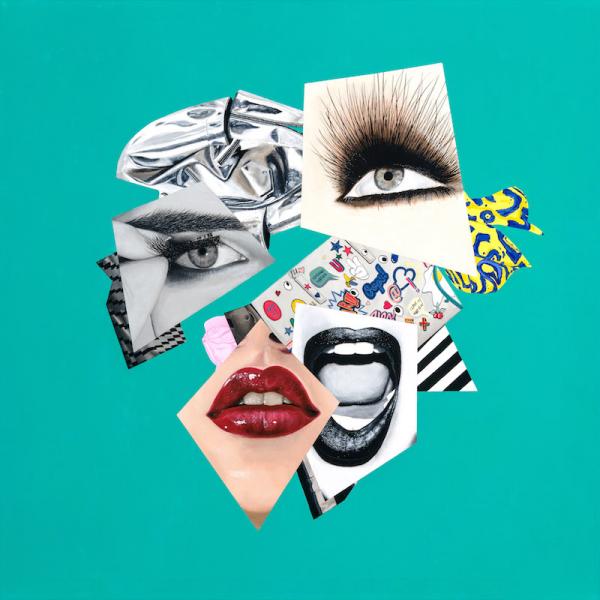
This week, we will have fun trying to make a digital collage in Vakseen’s style. Use lots of colours and try putting different things together in a cool way, like Vakseen does. Play with your digital tools and put your ideas together.
- Artist Research – Vakseen
- Artist Research Worksheet – Elements of Art
- Abstract collage inspired by Vakseen
- Evaluation on Abstract collage.
- Artist comparison
Artist reference
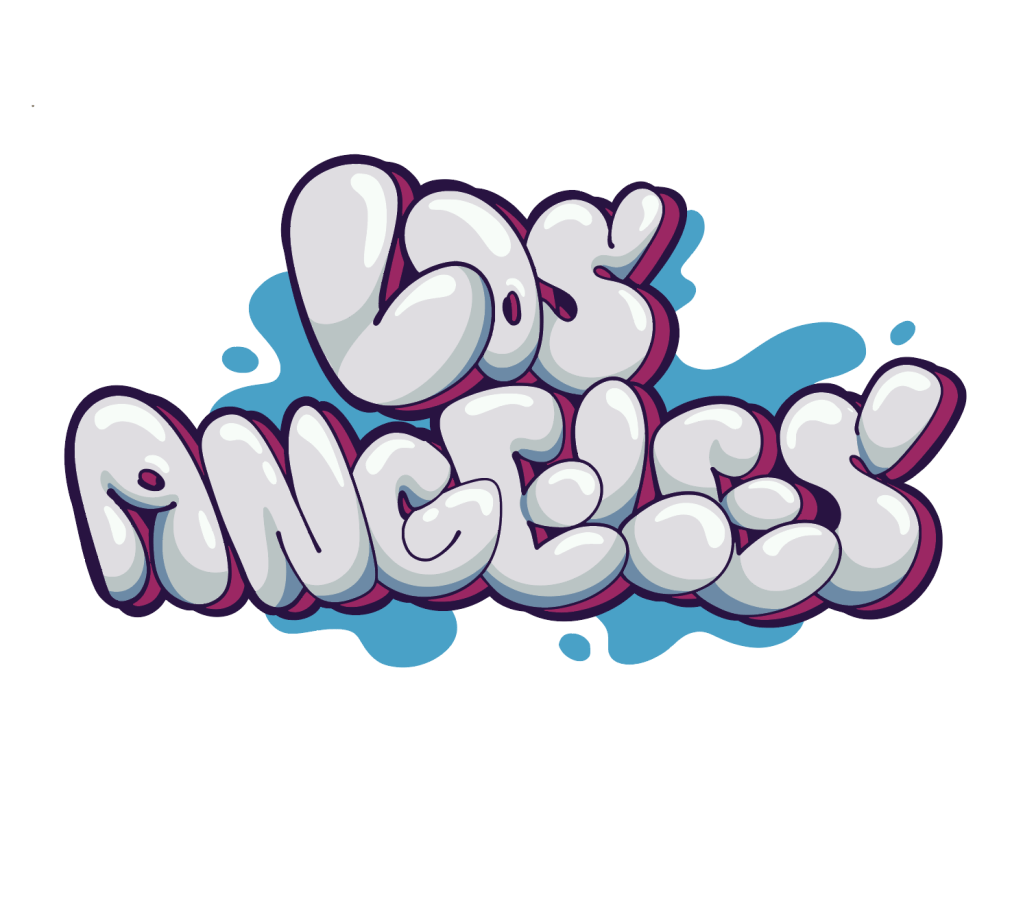
Los Angeles, California artist Vakseen’s work revolves around women, their natural allure and the insecurities or confidence created by Pop culture. The work is a reflection of society’s idolization of beauty and “perfect” images of women. The artist uses high-end fashion magazines to clip and surgically collage images together. He then recreates the work by painting it on canvas. The focus is Surrealism, consistently fused with elements of Hyperrealism and Cubism. While music has played the driving force in his business career, Otha “Vakseen” Davis III’s passion for the arts has served as his key to sanity in the fast-paced entertainment industry. His paintings have been shown in over 35 group and solo shows in the Los Angeles area and have been featured in over 40 art and literary magazines.
Lesson Tasks
Artist Research – Vakseen
Who is the artist?
Write the artist’s name (Vakseen), what type of artist they are (for example: digital illustrator), and where you can find their work (Instagram, website, etc.).
What does their artwork look like?
Describe the artist’s style. Talk about the colours, shapes, characters or faces you can see. Use visual words like bright, dark, surreal, simple, detailed.
What mood or feeling does the artwork give?
Explain how the artwork makes you feel and why. For example: calm, strange, happy, uncomfortable, dreamy. Link your answer to colour, facial expressions or composition.
How do you think the artwork was made?
Explain what materials or software the artist might have used (for example: digital drawing, Photoshop, Procreate). Mention any tools, brushes or techniques you notice.
How can this artist inspire your own work?
Explain what you would like to take from this artist (colour palette, style, theme, mood) and how you could use it in your own artwork without copying.
Artist Research Worksheet – Elements of Art
Abstract Collage Inspired by Vakseen


CMD C = Copy
CMD V = Paste
CMD T = Transform
CMD Z = Undo
CMD + = Zoom in
CMD – = Zoom out
CMD 0 = Fit to page
CMD J =New Layer Via Copy
CMD [ = Move the layer down
CMD ] = Move the layer up
CMD D = Deselect
Task Instructions
After completing your artist research, collect images of women’s faces and texture images that reflect Vakseen’s style.
Using Photoshop, you will:
- Use the Lasso Tool to cut organic, irregular shapes
- Use the Polygonal Lasso Tool to cut geometric shapes
- Copy and paste these shapes onto your canvas
- Layer shapes on top of each other to build a collage
- Use Free Transform to resize, rotate and adjust shapes
- Place everything on a solid colour background
Your final outcome should be an abstract digital collage inspired by Vakseen’s use of layering, shape and composition, not a copy of an existing artwork.
Focus on:
- Strong composition and colour choices
- Overlapping shapes
- Clear use of organic and geometric forms
Evaluation Writing frame
Week 3 and 4 – Project 3
This week, we will learn about street art and vandalism. We’ll look at their history and cultural importance. We’ll also talk about what’s right and wrong when it comes to street art, and how it affects public spaces and the rights of artists and property owners. We’ll see if street artists have a responsibility to the community and how their art can be good or maybe cause problems. To finish, each of you will make three Typography drawings inspired by street art styles.
- Difference between street art and vandalism quiz. (Answer and post a paragraph talking about what you have learned OR post a screenshot with your answers.)
- Digital drawings street art typography
- Complete: Distinctions between street art and vandalism Quiz.
Tasks
Street art Task
Distinctions between street art and vandalism quiz:
Digital drawings inspired by street art typography:
- Typography in Street Art: Go on Google and search “typography street art”. So you can get inspired to create your own art in Photoshop on an A4 Document – Landscape.
- Digital Drawing Guidelines: Create three digital drawings inspired by street art typography. Ensure each drawing reflects a different style or theme. Use Photoshop to create those and make sure you create the fill, outlines, shadows and highlights in different layers. Use the brush tool.
- Reflection: Add to each drawing your reflection paragraph. Discuss the artistic choices you made, like colour, line, shapes and style.
Examples:

Instructions
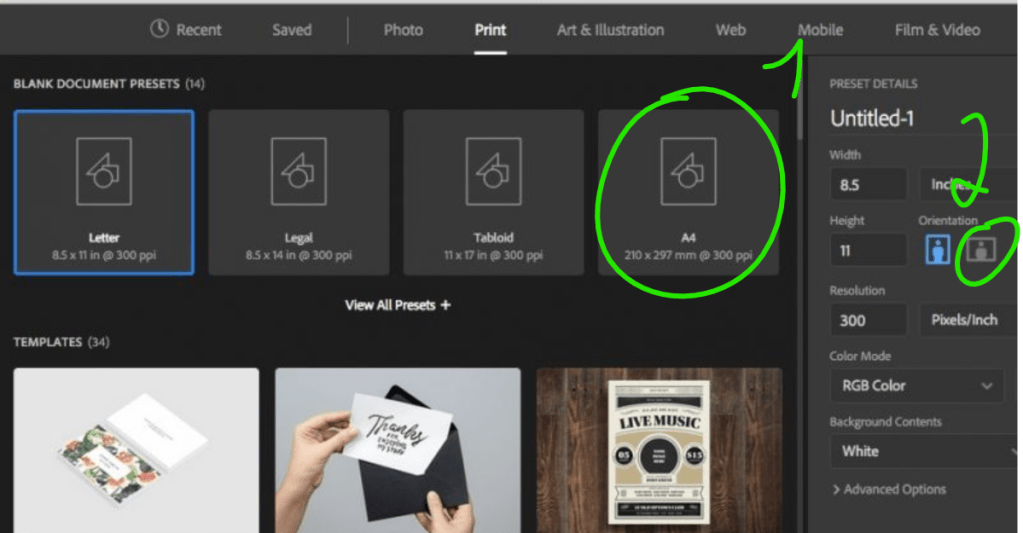
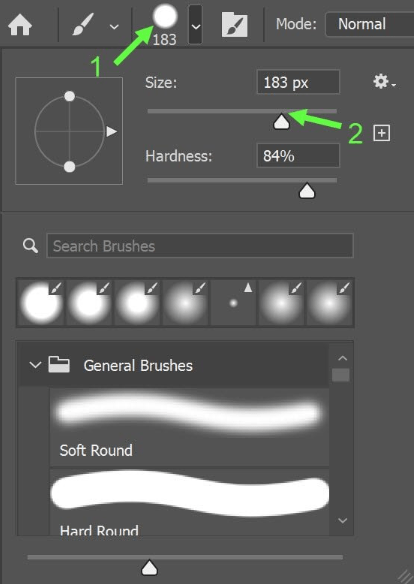
Click on file > new and select A4 on the print tab, then select landscape.
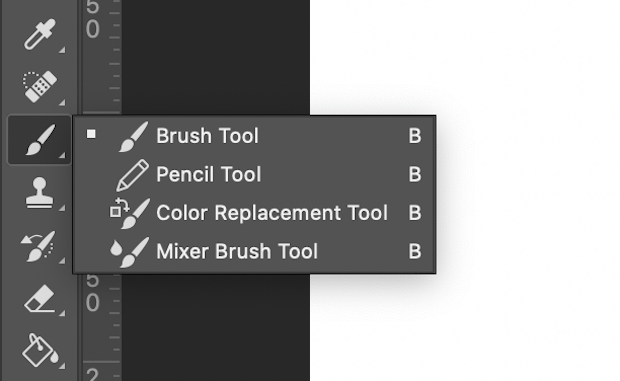
Use the Brush tool to draw and don’t forget to create different layers for fill, outlines and shadows.
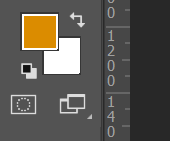
Select a colour that you would like to use.
Change the Brush Size Using the Brush Tools Option Bar.
Pull the Size slider to the left or right to change the brush size. The slider just below controls the hardness of the brush.
Also under General brushes you can select either Soft Round brush or Hard Round brush.
Week 5 and 6 – Project 4
- Artist Research – Asher Jay
- Asher Jay – 2 typographic illustration
- Asher Jay – 3 Silhouette Vectors
- Evaluate your work
Tasks Guidelines:
Artist Research – Asher Jay
Sources: Cite all the sources where you found information and images.
Collect Artworks: Find and download at least six images of Asher Jay’s digital artwork. Make sure to choose works that span different periods of her career or focus on various themes to get a comprehensive view of her portfolio.
Write an Analysis: Based on your research and the artworks you’ve collected, write a detailed analysis covering the following points:
Biography: Who is Asher Jay? Include her background, education, and what led her to focus on environmental issues through art.
Artistic Style: Describe her artistic style. What digital techniques does she use? Discuss her use of colour, form, and any recurring motifs or themes in her work.
Themes and Messages: What are the primary themes and messages conveyed through her art? How does she use digital art to address environmental concerns?
Personal Reflection: What do you personally like or dislike about her work? This could be related to her style, themes, or the impact of her art on society.
Relevance: Discuss the relevance of Asher Jay’s work in today’s context. How does her work inspire conversations or actions towards environmental conservation?
Typographic illustration/Calligrams on Adobe Illustrator

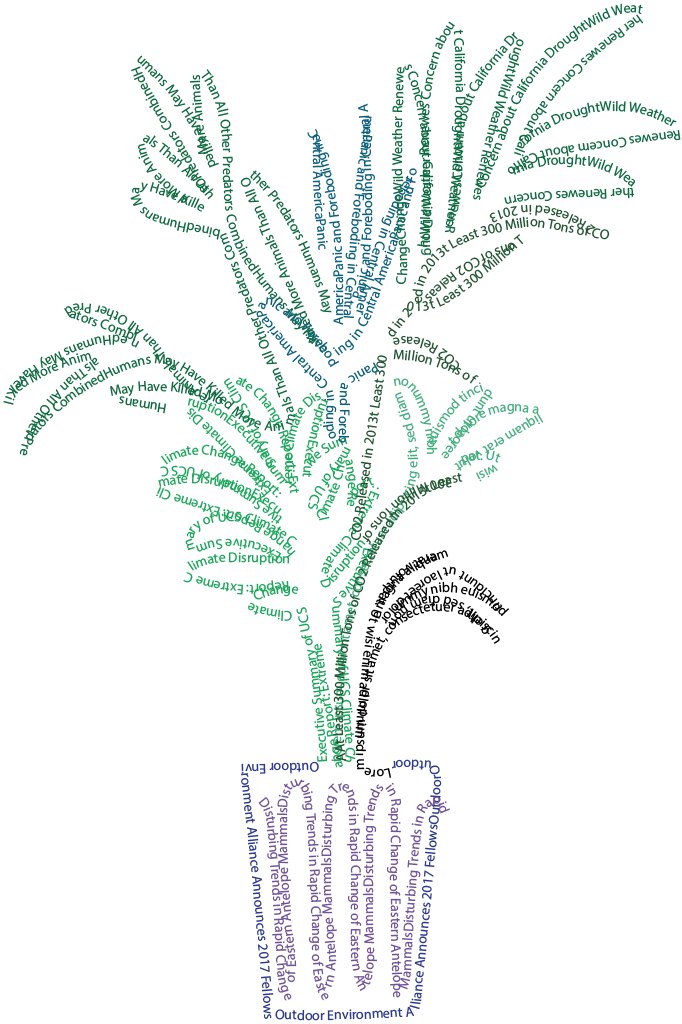
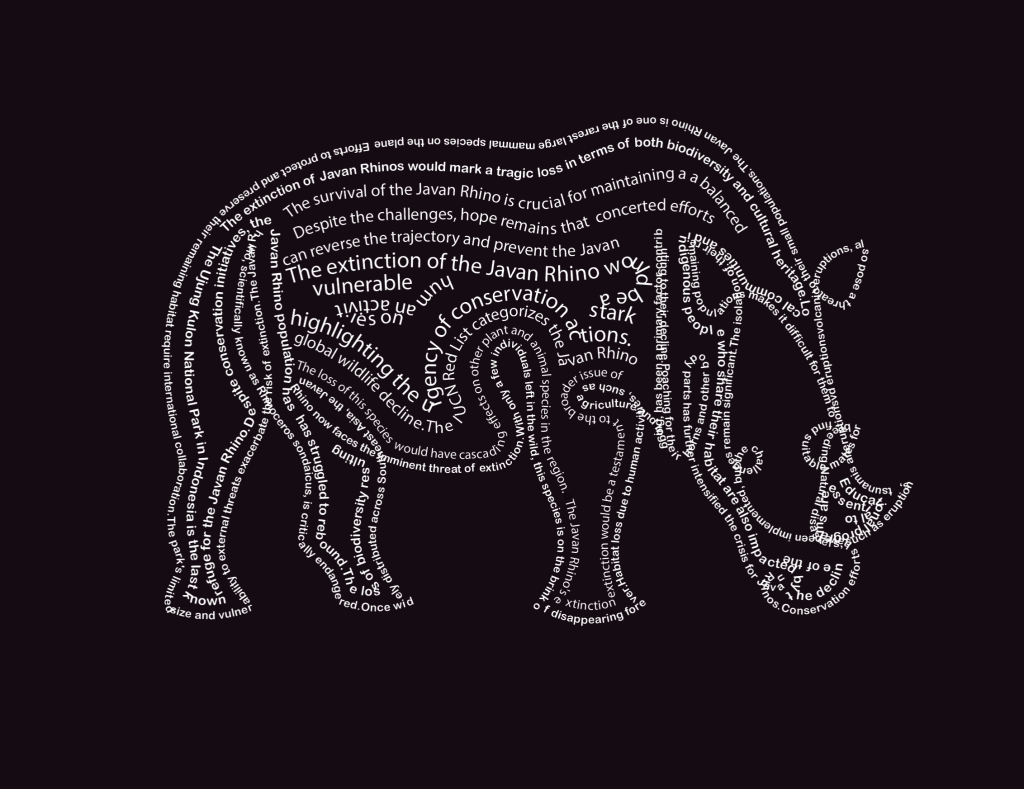
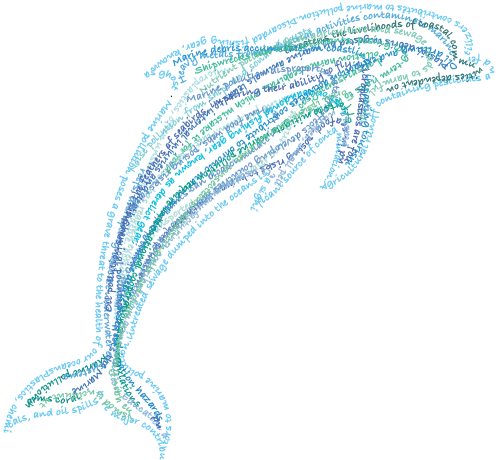
🧠 What you are creating:
You will design a visual image made entirely from text.
From far away, your work should clearly look like an animal or natural form.
Up close, the viewer should be able to read meaningful sentences about your theme.
Think of it as:
- A drawing made with words
- A message that becomes an image
Requirements
Your final outcome must:
- Clearly show a recognisable shape
- Be fully filled with text (no big empty gaps)
- Include at least 30 sentences
Stretch & Challenge (for higher grades)
- Use different font sizes to create detail and depth
- Write sentences that feel onnection between message and image
- Highlight key words by increasing size
- Use text density to create shading (more text = darker areas)
- Create a focal point (e.g. eye of the animal)
Text Collage in Illustrator – Step by Step
Step 1: Create your document
- Open Adobe Illustrator
- Click New File
- Choose A4 or A3
- Select Landscape or Portrait
- Name your file (e.g. Text Collage)
- Click Create
Step 2: Set up your workspace
- Go to Window → Workspace → Essentials Classic
- Click Reset Essentials Classic
- Make sure you can see:
- Toolbar
- Properties
- Layers (Window → Layers if missing)
Step 3: Add a silhouette (optional but recommended)
- Find a simple silhouette (e.g. whale, bird, tree)
- Place it into Illustrator
- Resize it to fit your page
- Lower the Opacity (around 5–10%)
- Lock the image
This will act as your guide.
Step 4: Select the Pencil Tool
- Click and hold the tool under the Shaper Tool
- Select Pencil Tool (N)
Step 5: Draw your paths
- Draw lines following the shape (outline and inside details)
- These lines are called paths (they guide your text)
Step 6: Remove colour from the path
- Select the path
- Set Fill = None
- Set Stroke = None
The path becomes invisible but still usable.
Step 7: Add text to the path
- Select the Type Tool
- Click on the path
- Type or paste your sentence
Your text will follow the line.
Step 8: Adjust your text
- Change font, size, and colour
- Use:
- larger text for key words
- smaller text for detail
Step 9: Repeat and build the shape
- Keep creating paths and adding text
- Fill the entire shape
- Avoid empty spaces
Silhouette Vector Artwork

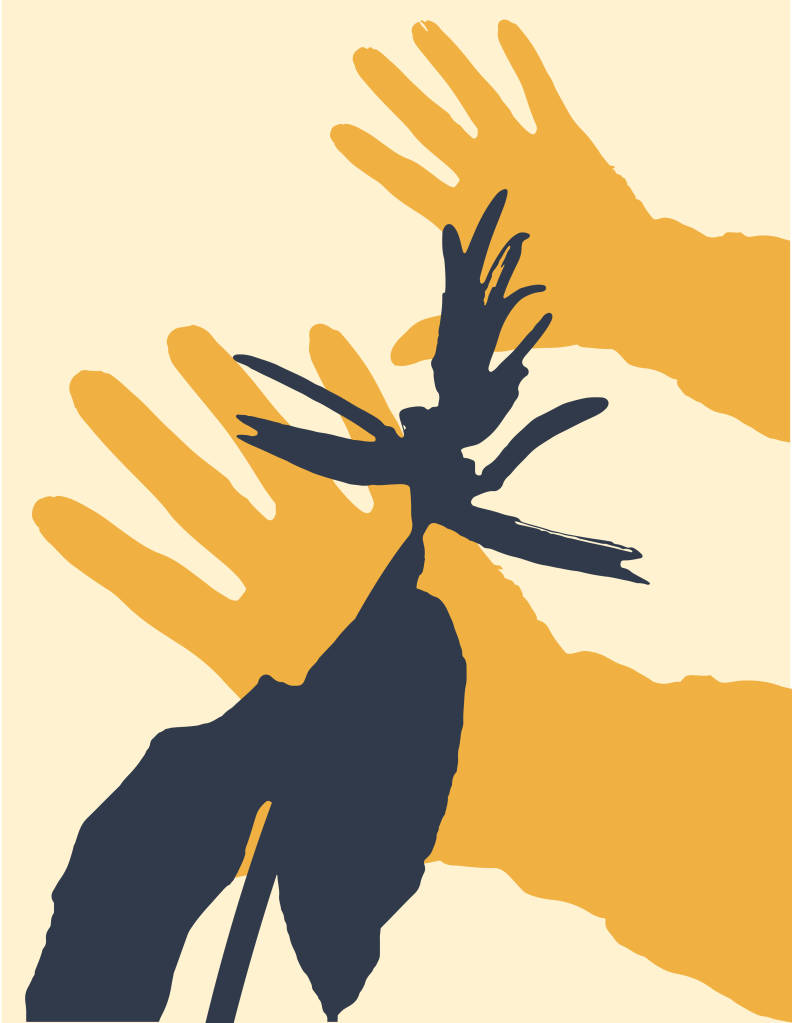

🎯 What you are creating
You will create a bold vector silhouette artwork that celebrates nature or wildlife, inspired by Asher Jay.
Your final piece should use simple shapes, strong colours, and clear composition.
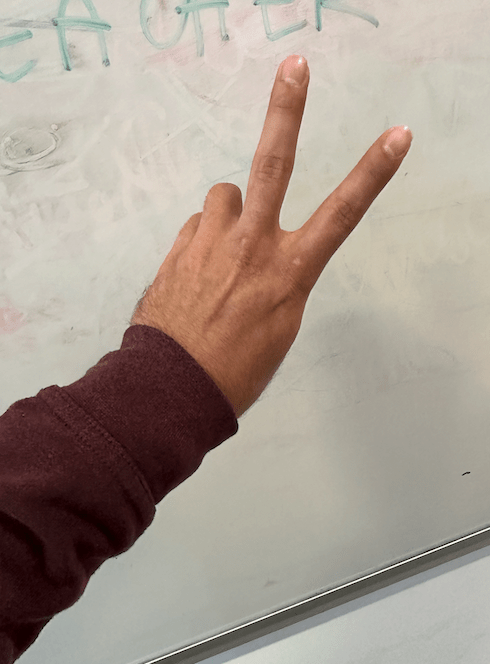
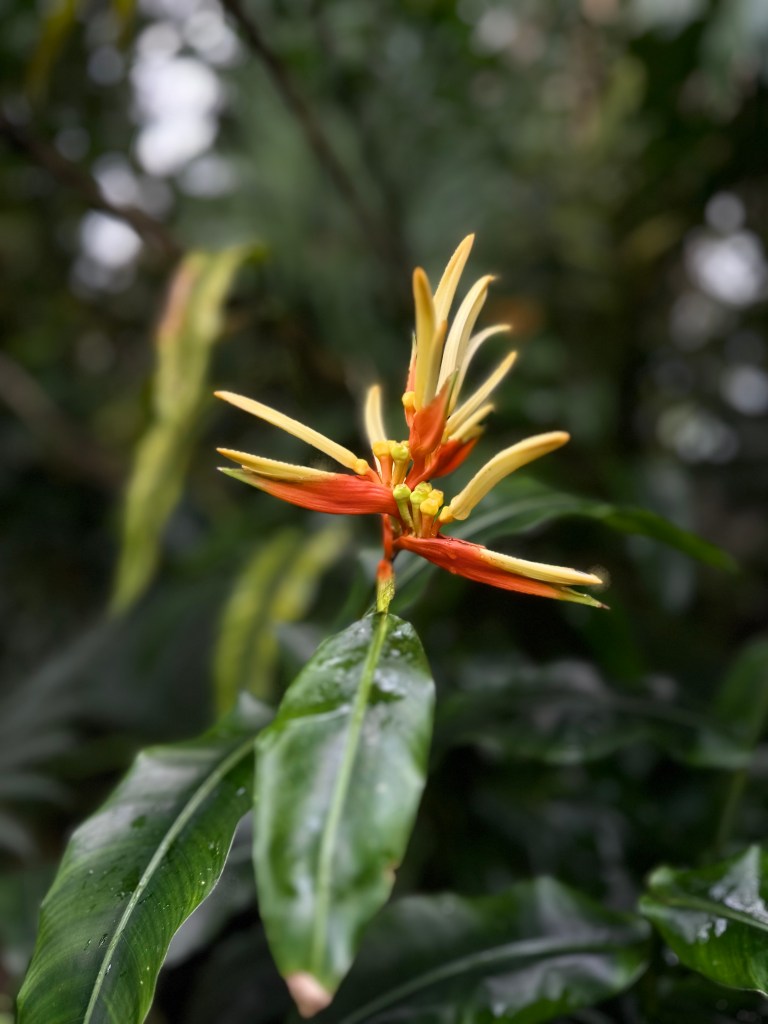
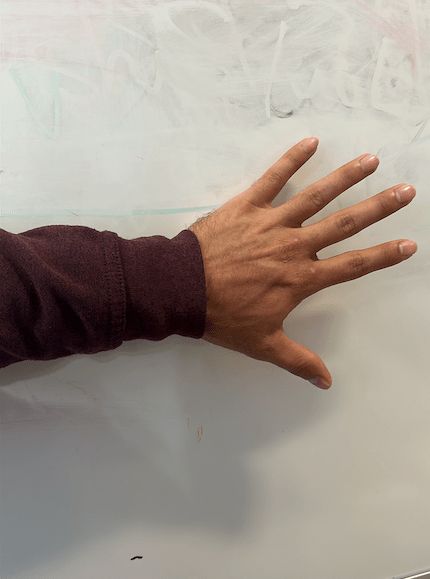
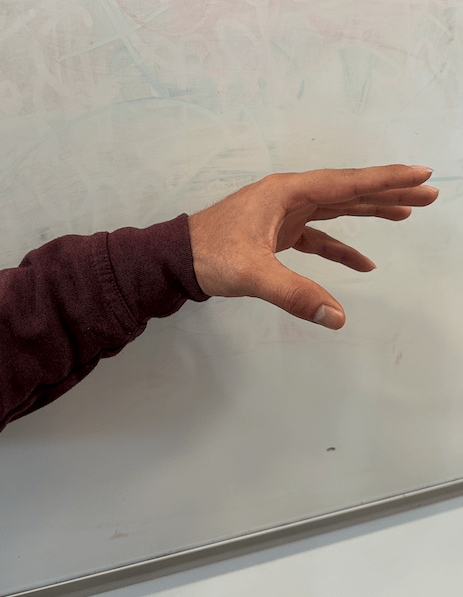
Step 1: Take your photos
Take your own photos using your phone.
You can photograph:
- Your hands (gestures like peace, open hands, reaching, etc.)
- Plants, leaves, flowers
- Objects from nature
Tips:
- Use a plain background (wall, table, sky)
- Make sure the subject is clear and in focus
- Take at least 3–5 photos
Step 2: Choose your best image
Pick 1 strong image that clearly shows your subject.
Ask yourself:
- Is the shape clear?
- Is it easy to recognise?
- Does it connect to “celebration” (e.g. life, growth, connection, nature)?
Step 3: Open in Photoshop and select subject
- Open your image in Photoshop
- Go to Select → Subject
- Click Select and Mask (optional for refinement)
- Clean up the selection if needed
- Press Ctrl/Cmd + C to copy
Step 4: Paste into Illustrator
- Open Adobe Illustrator
- Create a new A4 or A3 document
- Paste your image (Ctrl/Cmd + V)
Step 5: Create your silhouette
- Select the image
- Go to Image Trace
- Choose:
- Black and White Logo (recommended)
- Adjust threshold if needed
- Click Expand
Now your image is a vector.
Step 6: Clean your shape
- Use the Direct Selection Tool (A)
- Delete unwanted background shapes
- Keep only your main silhouette
Step 7: Apply colour
- Select your shape
- Choose a bold, flat colour
Recommended palette (Asher Jay inspired):
- Earth tones
- Greens / blues (nature)
- Warm tones (celebration, energy)
Step 8: Create your composition
Now build your artwork.
Try:
- Duplicate your shape (Ctrl/Cmd + C, Ctrl/Cmd + F)
- Resize, rotate, or flip (Right click → Transform)
- Use different colours
- Overlap shapes to create depth
Ideas:
- Multiple hands reaching (connection)
- Layers of leaves (growth)
- Repetition to show movement or energy
Step 9: Arrange your final design
Think about:
- Balance (not too empty, not too crowded)
- Clear focal point
- Strong contrast between shapes and background
Step 10: Final check
Ask yourself:
- Is my shape clear?
- Does it feel bold and simple?
- Does it connect to celebration?
- Do the colours work well together?
Step 11: Save your work
Export as PNG
