Your WordPress blogs are where you will present all your coursework throughout the academic year. This includes large-scale work, sketchbook work, 2D work, digital work, animation, 3D projects and any other artwork you create. You must photograph and upload all relevant work to the correct blog.
You will create five blogs:
- Induction
- Project 1
- Project 2
- Final Major Project (FMP)
- Hub
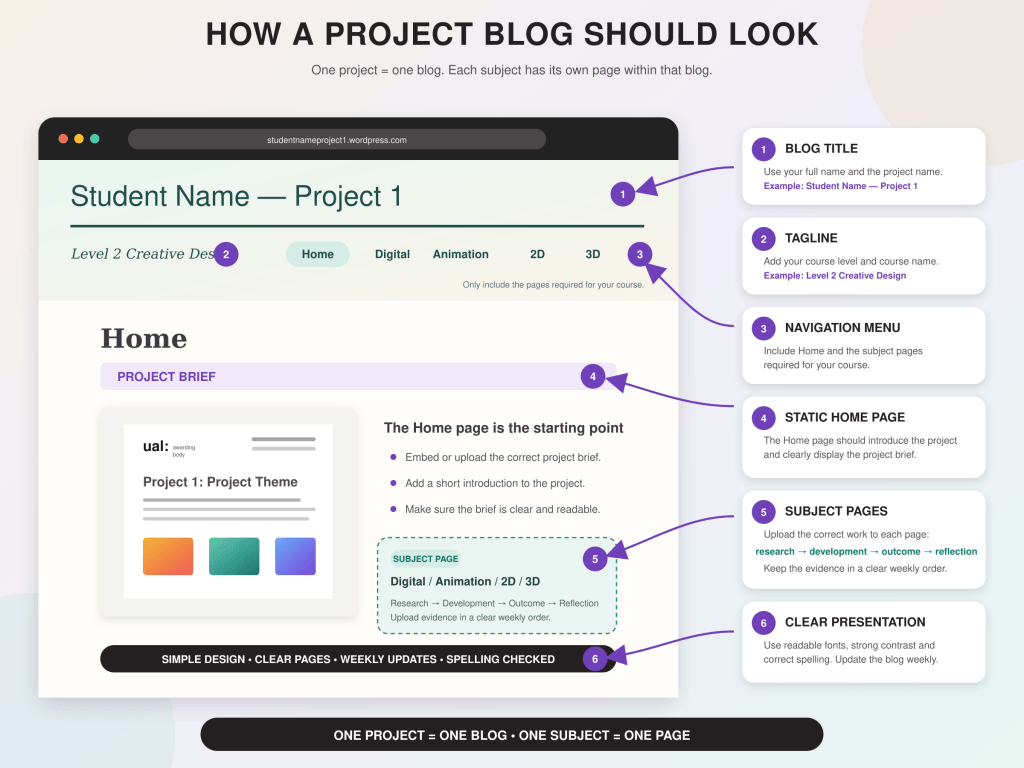
Each project blog will contain separate pages for the areas included in your course, such as Digital, Animation, 2D and 3D. Check below for each course the pages you will need.
The Hub is your main blog. It connects all your work and contains:
- A Home page with five buttons
- A WEX page for your work experience evidence
Four buttons will link to your separate project blogs. The fifth button will link to the WEX page within your Hub.
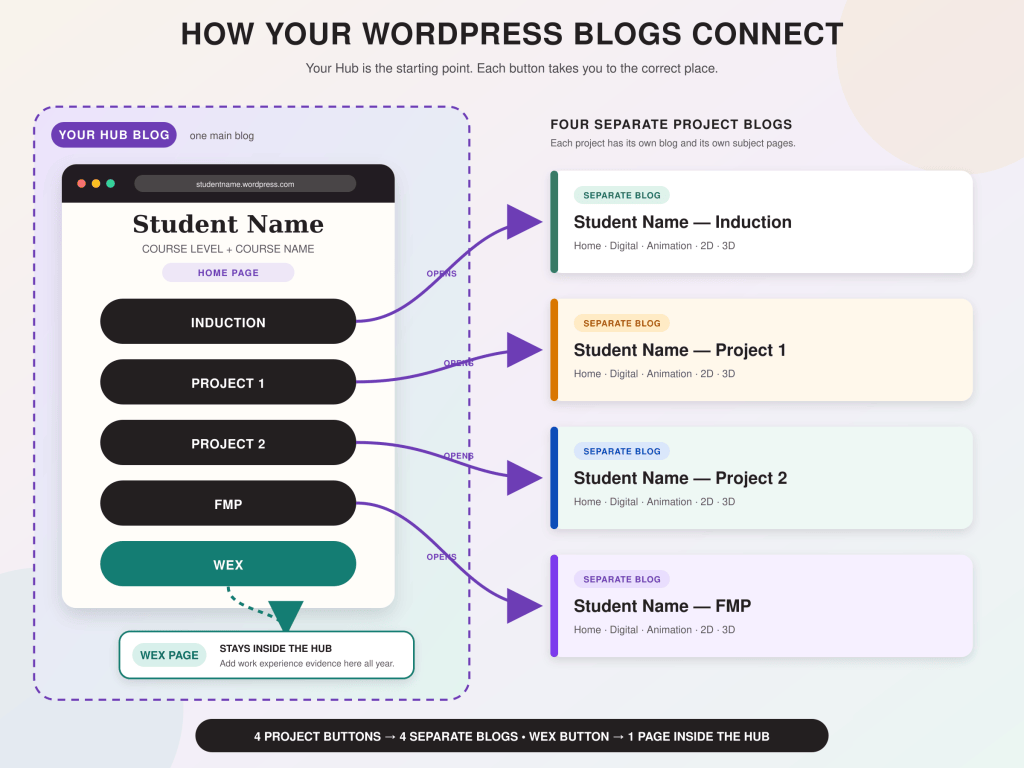
Your project lecturers, SLA and WEX employer link will regularly review your blogs. You must therefore maintain and update them every week.
Your blogs must:
- Be easy to navigate
- Be free from spelling and grammatical errors
- Present your visual and written work clearly
- Remain published and accessible throughout the year
Your blogs will provide evidence for your final assessment and may be accessed by the UAL Awarding Body at the end of your Final Major Project. If your blogs cannot be accessed or assessed, this could negatively affect your grade. Do not delete your work, delete your blogs or take them offline.
This setup task is also part of your induction assessment. It will help your lecturers understand how independently you can follow instructions, organise information and use digital platforms.
AI must not be used to produce written work, practical development or personal outcomes.
Important: Your blogs must not contain inappropriate, explicit or unapproved sensitive visual material or language. If you think your work could be considered sensitive, such as life-drawing material, speak to your course leader before uploading it. This will help ensure that you are protecting yourself and your blog.
Step-by-Step Guide to Creating Your Blogs
1. Create a New Account
This section is for new students who do not already have a WordPress account.
- Go to WordPress.com.
- Click Get Started.
- Click Continue with email.
- Enter your college email address.
Your college email address is your student ID number followed by:
@student.west-thames.ac.uk
WordPress will not ask you to create a password at this stage.
Confirm Your Email Address
Before creating any blogs:
- Open your college email account.
- Find the confirmation email from WordPress.
- Click Confirm your email.
- Return to WordPress and continue with the setup.
Do not begin creating your blogs until you have confirmed your email address.
Part 2: Creating Your Induction Blog
You will create and fully customise your Induction blog first. Once you understand the complete process, you will repeat the essential steps for Project 1, Project 2 and FMP.
Choose Your Blog Address
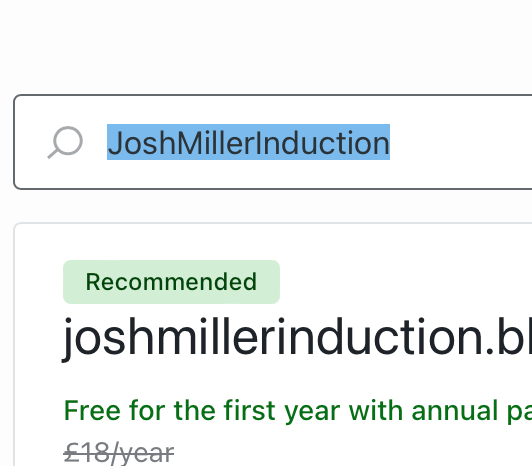
Your blog address must include your first name + surname + induction
For example:
johndoeinduction.wordpress.com
If your preferred address is unavailable, WordPress may suggest an address containing numbers. Instead, try adding a relevant word such as art:
johndoeartinduction.wordpress.com
Do not include spaces in the blog address.
Step 3: Create and Launch Your Induction Blog for Free
Follow these instructions carefully. You do not need to pay for your blog.
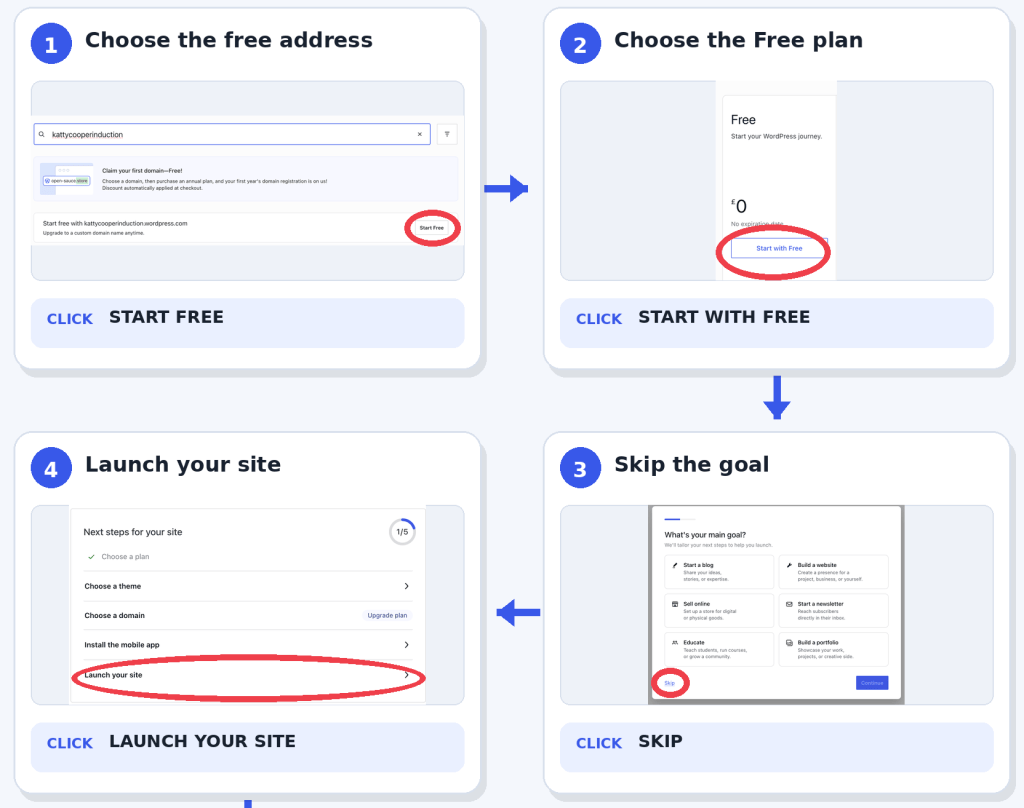
- Find the option ending in .wordpress.com.
- Click the small Start Free button.
- On the plans page, select the first plan called Free – £0. Click Start with Free.
- When WordPress asks you to set a goal, click Skip.
- Wait for the WordPress dashboard to open.
- Find the setup checklist and click Launch your site.
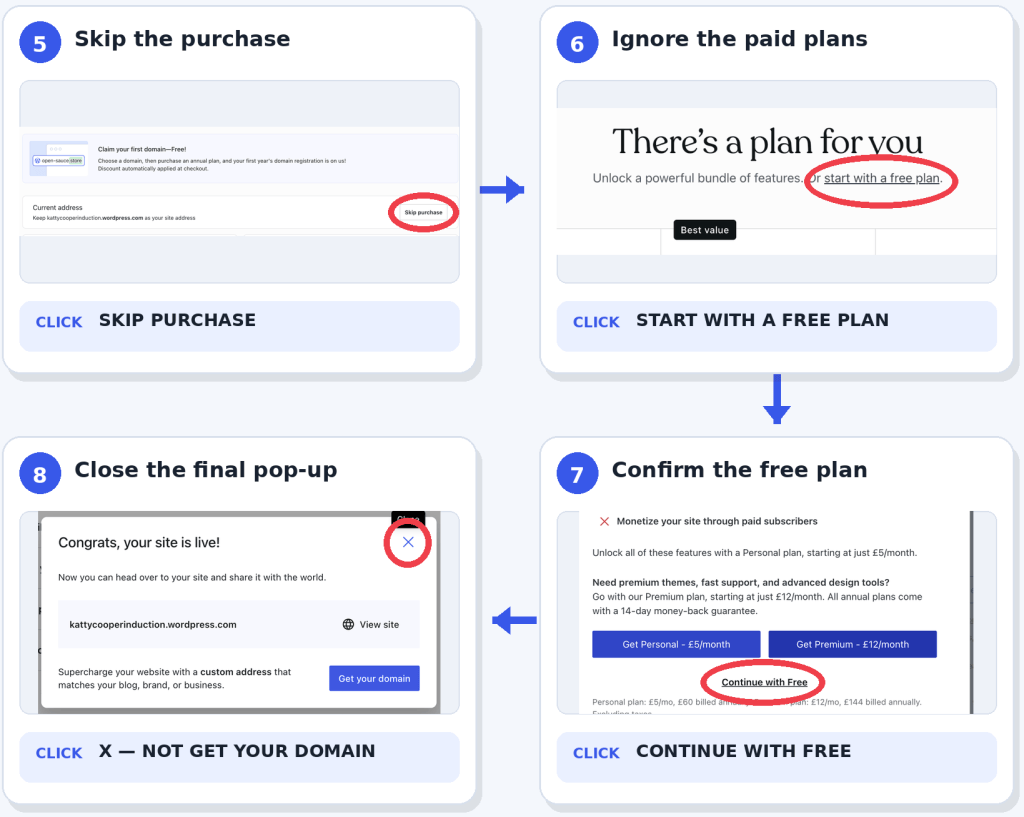
- On the Claim your space on the web page, find Current Address and click Skip Purchase.
- On the next plans page, click Start with a free plan.
- When the Don’t miss out message appears, click the small Continue with Free link.
Click the X in the top-right corner. - Do not click Get your domain. This will take you to a paid option Click the X in the top-right corner.
4. Selecting a Theme
To change the look of your blog, go to “Dashboard,” then “Appearance,”. Search for the “Rebalance” theme, click on the “Rebalance” theme and and activate it. Then click on “Customise design”.
6. Personalising Your Blog
6.1 Site Identity
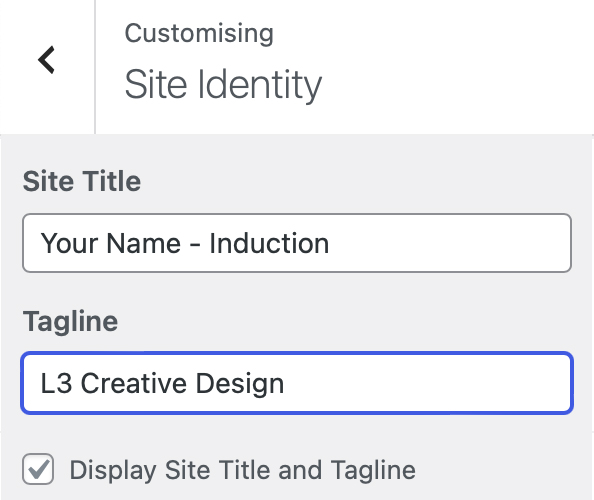
Begin by changing your “Site Identity.” Set your name and the project name as the site title and use your course name and level as the tagline (e.g., L2 Creative Design”). Save your changes as you go to avoid losing any work. Use the Arrow to return to Customising.
6.2 Creating a Menu and Pages
Next, let’s create a navigation menu. Click on “Menus” and name your menu (e.g., “Main Menu”). Choose the “Header Menu” option and click “Next.” Add items to your menu by clicking “Add Items.” Create a “Home” page and one page for each of your projects (e.g., “Digital,” “2D,” “3D”). After adding all the pages, save your changes.
6.3 Setting a Static Homepage
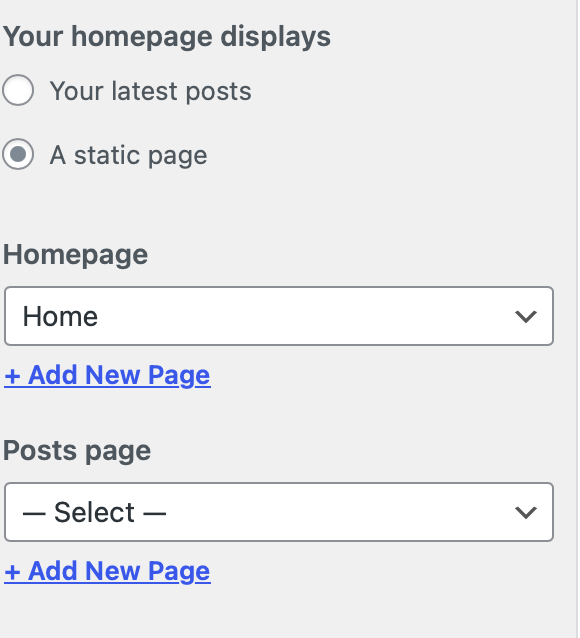
Still in the “Customise” section, go to “Homepage Settings.” Change the setting from “Your latest posts” to “A static page.” Select “Home” as your homepage and leave the “Posts page” option unselected, as we won’t be using posts. Save changes and return to customise.
6.4 Customising the Design
On “Colour and Backgrounds” You can personalise your blog by exploring different colours and fonts. However, follow these guidelines:
- Don’t use patterns, background images, or animations.
- Choose harmonious colours with high contrast between text and background (e.g., black text on a white background).
- Stick to standard Serif or Sans Serif fonts.
Your design must be approved by your teacher, so make sure it adheres to these guidelines.
Once you’re done, save your changes and return to the dashboard by clicking the “X” at the top left corner and then on “Back to dashboard“
7. Adding More Blogs for Your Projects
Once you’ve set up your first blog, you’ll need to create additional blogs for each of your projects: Project 1, Project 2, and FMP.
- Go to Your Dashboard
From your current dashboard, click on the WordPress icon located in the top left corner. This will take you to a page where you can view all of your sites. - Add a New Site
On this page, you’ll see a list of your existing sites. Click on “Add New Site.” This will start the process of creating another blog. - Repeat the Setup Process
Follow the same steps you used to create your first blog:- Choose a domain name that includes your name and the specific project (e.g., “JohnDoeProject1”).
- Follow all the steps before changing the name of the blog according to the project you are creating.
- Launch your site and customise it as needed.
Repeat this process for each of the remaining projects: Project 1, Project 2, and FMP.
8. Setting Up Your Main Blog
In addition to the project blogs, you’ll need to create a main blog that serves as the central hub for all your work. This main blog will feature your name, course level, and links to your four project blogs.
1. Create Your Main Blog
- Go to Your Dashboard
Start by returning to the WordPress dashboard. Click on the WordPress icon in the top left corner to view your sites. - Add a New Site
Click on “Add New Site” to begin setting up your main blog. - Choose a Domain Name
For this blog, the domain should be your name (e.g., “JohnDoe”). If that’s not available, add the word “art” to the domain (e.g., “JohnDoeArt”). - Choose a Plan
Select the free domain option, then click “Continue.” When asked to choose a plan, select “Start with Free” (the first option). - Launch Your Site
Skip any goal-setting by clicking “Skip to Dashboard” at the top right. Launch your site by following the same steps: go to the checklist, click “Launch Your Site,” and close the pop-up.
2. Personalise Your Main Blog
- Select a Theme
Go to “Dashboard,” then “Appearance,” and choose “Themes.” Search for the “Rebalance” theme, and activate it. - Set Your Site Identity
Navigate to “Customise this design” and go to “Site Identity.”- Site Title: Enter your full name as the site title (e.g., “John Doe”).
- Tagline: Enter your course level and name as the tagline (e.g., “Level 1 Creative Design”).
Save your changes.
- Create a Menu and Home Page
Now, create a simple menu with just one page: “Home.”- Go to “Menus,” name your menu (e.g., “Main Menu”), and select “Header Menu.”
- Click on “Add Items,” then create a page called “Home.”
- Save your changes.
- Set a Static Homepage
In the “Customise” menu, click on “Homepage Settings.” Change the selection from “Your latest posts” to “A static page.” Select the “Home” page as the homepage and leave the “Posts page” option unselected. - Final Design Customisation
You can customise your blog’s appearance by adjusting colours and fonts. Keep it simple and professional:
- Colours: Choose high-contrast combinations, like black text on a white background.
- Fonts: Stick to standard Serif or Sans Serif fonts.
Return to Dashboard.
Adding the buttons with the links
- Click on Pages and Find Home
- On the “Home” page, add a block by clicking the “+” icon and selecting “Buttons.”
- Create four buttons, one for each of your project blogs.
- Label each button with the project name (e.g., “Induction,” “Project 1,” “Project 2,” and “FMP”).
- Link each button to the corresponding project blog by pasting the URL into the button’s link field.
- Save your changes.
The best way to find the links to your sites is going to the Sites page and right click on the link an “Copy link address”
 Art & Design @ West Thames College